
Throughout my whole career, I have see Data Highway Plus (DH+) built with good intention but as the facility matures, due to the cocktail of “project compartmentalization” and “tunnel vision” of project … and budget or course, this network design best practice get neglected. And DH+ no doubt being a very rugged communication protocol, will work under these circumstances, but over time the reliability of this network starts to deteriorate.
This article will focus on rules and guidelines on how a DH and DH+ network can be connected. This article does not cover DH II and DH-485.
Most of the notes from this article has been summarized from the Allen-Bradley Data Highway/Data Highway Plus/ Data Highway II/Data Highway-485 Cable (1770-um022_-en-p). Therefore, I take no credit for some of the pictures and verbage in this article. This article is written to give a high level summary of the Data Highway/Data Highway Plus/ Data Highway II/Data Highway-485.
The Allen-Bradley Data Highway(DH) and Data Highway Plus (DH+) systems are Local Area Networks (LANs). They connect PLC, computers, and other devices so they can communicate and exchange data with one another. Cables are the physical means of transmitting this data between nodes.
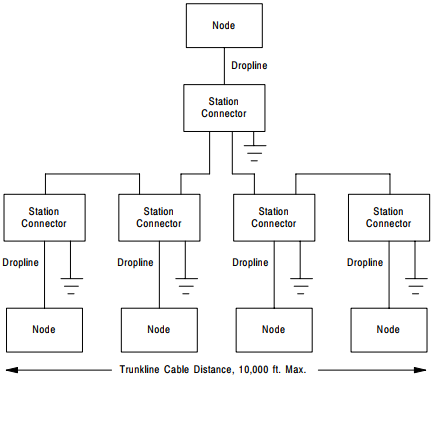
Ok, lets begin… The image below shows a typical Data Highway network with some basic terminology.
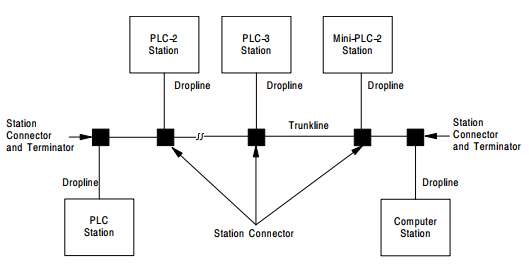
- For DH network, you must construct it using station connectors and droplines.
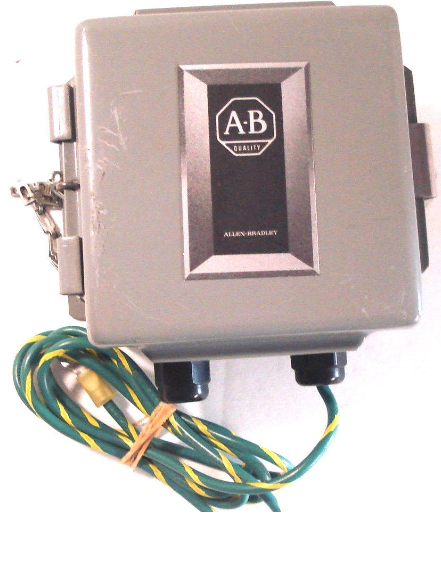
- For DH+ network, you may use station connectors and droplines, or daisy chaining to connect the devices on your network. Image below shows a typical Station Connector.
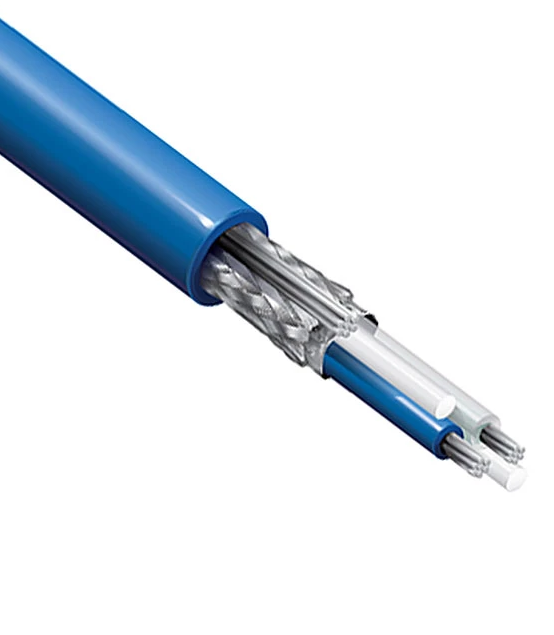
- The maximum length for the trunkline is 10,000 feet (3050 meters). A typical you can use Belden 9463 twinaxial cable (as shown below).
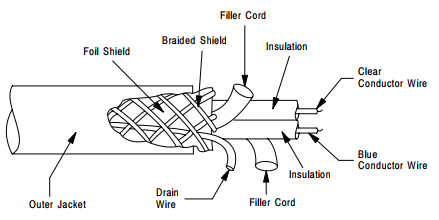
- The trunkline on your network is divided into several segments. The cable length of the trunkline is equal to the total cable length of the trunkline segments.
- Always calculate the three-dimensional path distance when determining cable lengths. In another words the actual cable path as it is routed in your network; both vertical as well as horizontal dimensions.
- Each dropline must be no more than 100 feet (30.5 meters) long. If possible, keep the dropline cables longer than 10 feet (3.0 meters) in length.
- Do not allow tension to be exerted on the cable as tension on the cable can
damage the cable and connectors. Always allow sufficient slack in the cable. - A DH or DH+ network can have no more than 64 nodes. Each station connector on the trunkline counts as one of those nodes, even if no dropline or device is connected to that station connector.
- If you install additional station connectors, do not install the dropline to the connector. An unattached dropline acts as an antenna for network noise.
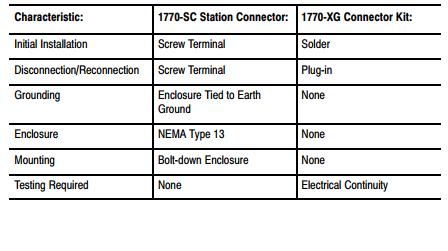
- There are two types of station connector. The table below summarizes the difference between the two of them.
1770-SC station connector
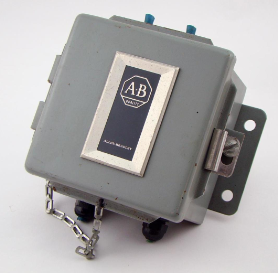
Note that, a 1770-SC station connector links a dropline cable to the trunkline and also links two trunkline segments together. - 1770-XG connector kit
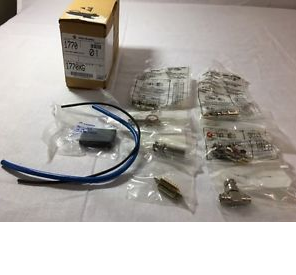 The components of a 1770-XG connector kit.
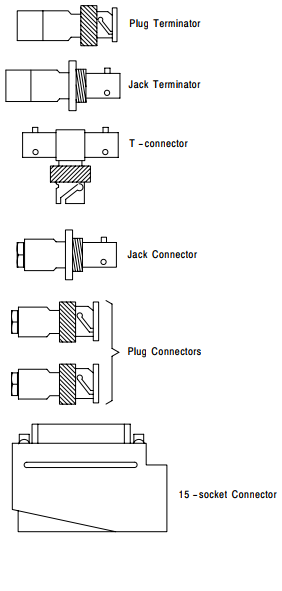 Anatomy of the 15-socket connector.
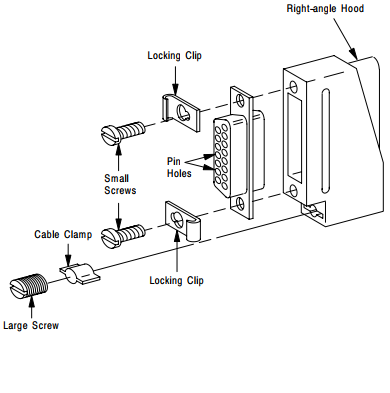 For more detailed information of the feature of these two Station Connector, see page 2-6 of Data Highway/Data Highway Plus/ Data Highway II/Data Highway-485 Cable (1770-um022_-en-p) user manual. See link below in Reference.
 - Image below illustrates a network constructed using the components of a 1770-XG connector kit.
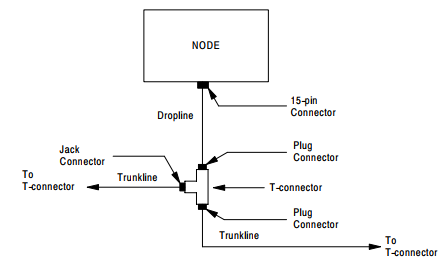
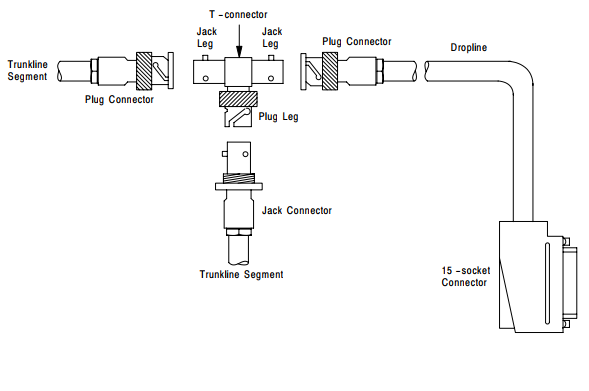
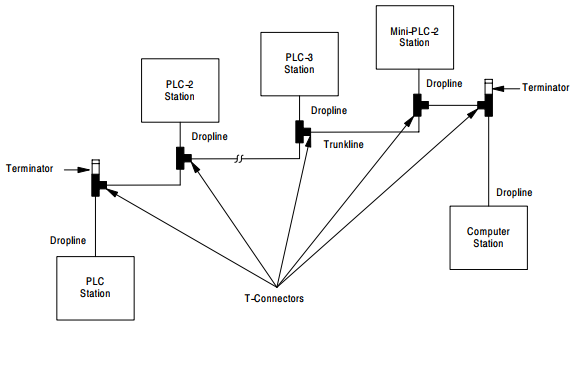
- If the 1770-XG connector kit is used, the terminators that must be installed in your DH or DH+ cable system. These terminators are included in the 1770-XG connector kit. You must install two terminators (one plug terminator and one jack terminator) for a complete DH or DH+ network.

- Image below illustrates typical placement of terminators in a DH or DH+ network if 1770-XG connector kit is used.
- Image below illustrates typical DH or DH+ network if 1770-SC station connector is used.
- If you prefer not to use station connectors and droplines on your DH+ network, you may interconnect nodes in a daisy chain fashion. But daisy chaining is only applicable to Data Highway Plus network design.
- When designing raceway (cable tray) layout, segregate all wires and cables into the three categories shown in table below.
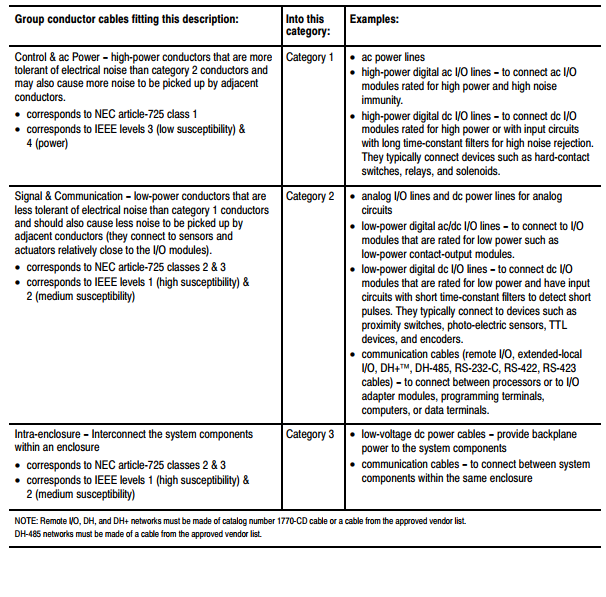
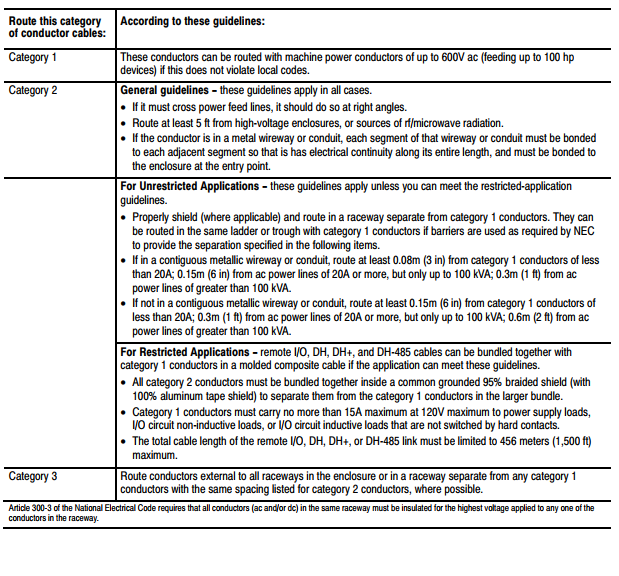
These guidelines coincide with the guidelines for “the installation of electrical equipment to minimize electrical noise inputs to controllers from external sources” in IEEE standard 518-1982. See “Summary of IEEE 518 – 1982 standard” below and the reference PDF for details. - To guard against coupling noise from one conductor to another, follow the general guidelines shown in table below.
Electrical Connector (to device/PLC)
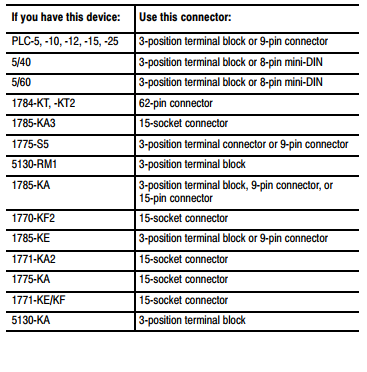
The type of electrical connector you attach to the dropline depends upon the device you are connecting to the network. See table below for the most common types of electrical connectors used with the different devices.
The pin-out diagram below shows different electrical connector for different devices.
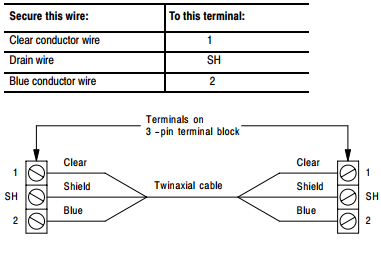
- Connecting the dropline to the 3-position terminal block connector.
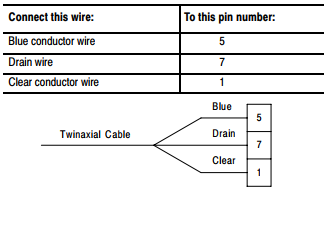
- Connecting the dropline to the 9-pin electrical connector
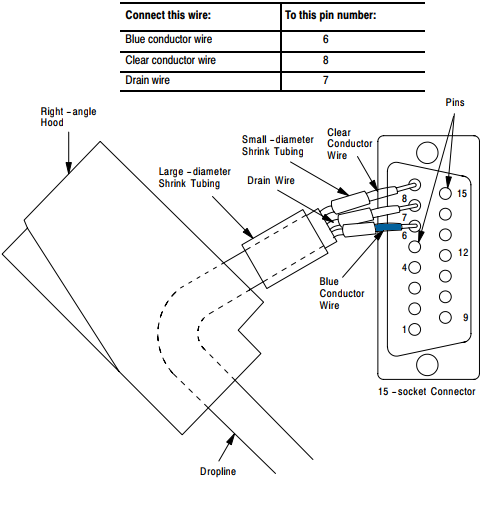
- Connecting the dropline to the 15-socket connector and secure each wire with a bead of solder.
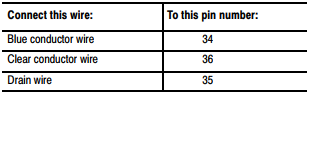
- Connecting the dropline to the 62-pin connector
Testing For Electrical Short
After you have soldered the connector to the dropline, you must check for electrical shorts. To do this, measure the resistance between the following wires.
- Blue conductor wire and the drain wire
- Drain wire and the clear conductor wire
- Clear conductor wire and the blue conductor wire
If the resistance readings you obtain indicate there are no shorts, you are now ready to attach the dropline to a station connector.
Connecting the Dropline to the 1770-SC Station Connector
The diagram below show how to connect trunkline (both in and out) and dropline to a 1770-SC Station Connector.
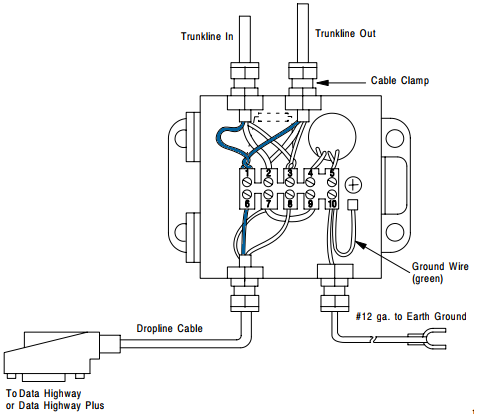
Do not allow the foil shield, braid shield, or drain wire to contact the metal box. If any of these components contact the metal box, the reliability of the link could be significantly reduced.
Table below outlines how to wire the dropline cable drain depending on the length of the dropline.

Table below outlines the remaining two wire pinout on the 1770-SC Station Connector.

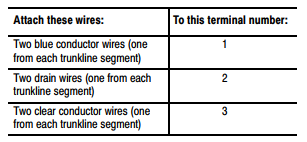
Table below outlines trunkline pin-out on the 1770-SC Station Connector.
How to Install a Terminating Resistor in 1770-SC Station Connector
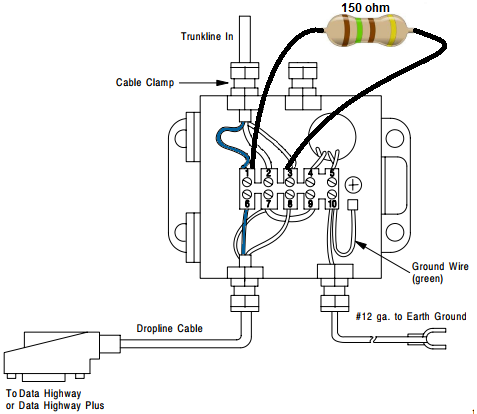
To minimize signal reflections from the ends of the trunkline, you must attach a 150-ohm 1/2 watt terminating resistor on the first and last station connectors on the trunkline. (The terms “first” and “last” refer to the physical location of the node along the trunkline, and not the node’s station number)
- Connect the dropline to the station connector (see section above, “Connecting the Dropline to the 1770-SC Station Connector”).
- Connect the one trunkline segment to the station connector (see section above, “Connecting the Dropline to the 1770-SC Station Connector”).
- Slip a one-inch (2.5 cm) length of shrink tubing over the 150-ohm terminating resistor and connect the leads of the resistor to screw-clamp terminals 1 and 3.
- Repeat steps 1 through 4 at the other end of the trunkline.
Network Checkout
CHECK #1
Check the resistance between the following points.
- Sockets 6 and 8 on each 15-socket connector
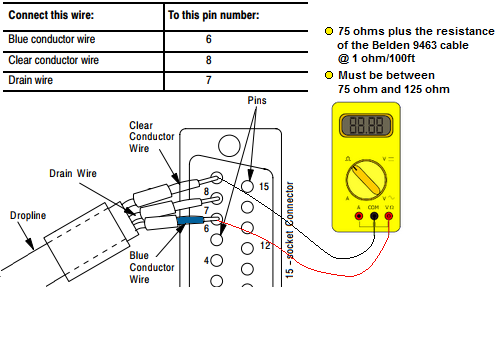
- Blue and clear wires on each station connector
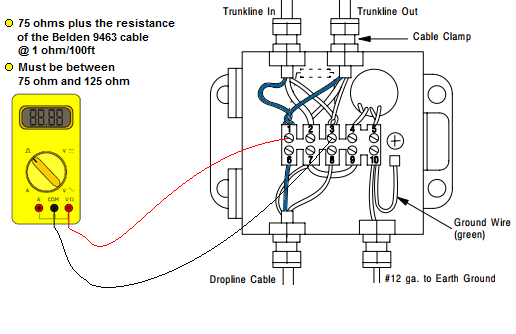
The readings should be 75 ohms plus the resistance of the Belden 9463 cable. Belden 9463 has a typical resistance of 1 ohm per 100 feet.
The resistance readings should be no less than 75 ohms +/- 1%, and no more than 125 ohms +/- 10%. If the resistances do not fall within this parameter, you must locate and correct the error before network start-up.
CHECK #2
This check has to be done from end station connector. Remove the resistors from the end station connectors and check the resistance between sockets 6 and 8 on any 15-socket connector on the network. There should be infinite resistance.
CHECK #3
Connect socket 8 to building steel (chassis ground). The resistance on socket 8 should be 1,000 ohms or less, and the resistance on sockets 6 and 7 should be one meg ohms or more.
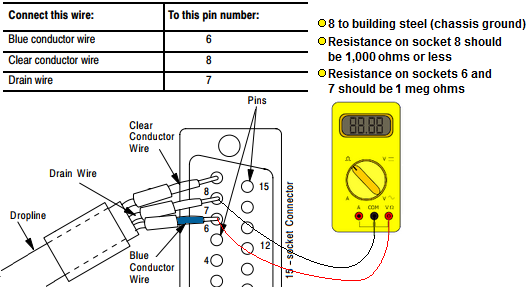
If the trunkline is routed between several building structures, building-to-building ground potential may differ. This checkout should be done on a per building basis.
Daisy Chain Configuration (DH+ Only)
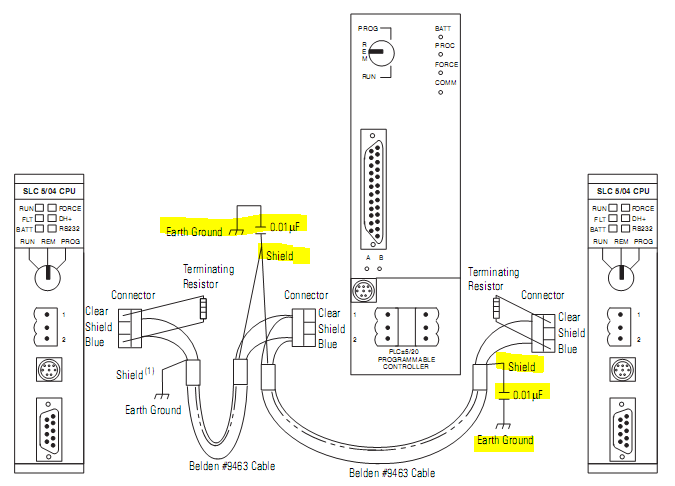
Network diagram below shows a typical DH+ network using daisy chain. Note that daisy chain can only be used for DH+.


Why is there a Capacitor to ground
Capacitors between power and ground is used to suppress spikes. These spikes can damage the board, or at least, the sensitive components. For that reasons, this capacitor is also called blocking capacitor. The larger the value of the capacitor, the better the protection. It also provides protection against noise which is the most important factor in DH+. In order to minimize the effect of noise, ground the shield cable to earth via 0.01uF (at least) capacitor as shown below. Diagram below is from SLC 500 Modular Hardware Style document from Allen-Bradley (page 225).
Summary of IEEE 518 – 1982 Standard
The list below is a summary from IEEE 518 – 1982 standard where it identifies four susceptibility levels. Referent to “IEEE Std 519-1992 IEEE Recommended Practices and Requirements for Harmonic Control in Electrical Power System.” in the Reference section below.
Level 1 (High) – This is defined as analog signals less than 50 V and digital signals less than 15 V. This would include digital logic buses and telephone circuits. Data communication cables fall into this category.
Level 2 (Medium) – This category includes analog signals greater than 50 V and switching circuits.
Level 3 (Low) – This includes switching signals greater than 50 V and analog signals greater than 50 V. Currents less than 20 A are also included in this category.
Level 4 (Power) – This includes voltages in the range 0–1000 V and currents in the range 20–800 A. This applies to both AC and DC circuits.
Reference
- Data Highway/Data Highway Plus/ Data Highway II/Data Highway-485 Cable
- IEEE Std 519-1992 IEEE Recommended Practices and Requirements for Harmonic Control in Electrical Power System
- IEEE Std 519-1992 IEEE Guide for the Installation of Electrical Equipment to Minimize Electrical Noise Input to Controllers from External Sources
- Cable spacing as a means of noise mitigation